Replacing an electrical outlet is an easy undertaking with a basic understanding of how residential electricity works.
In a basic residential wiring circuit, a black (hot) wire comes out of a breaker in the electiric panel and runs to the outlet.
A white wire (neutral) runs from the elecrical outlet back to the ground bar in the electric panel.
There is also an uninsulated wire - just copper with no plastic insulation - that runs from the green screw on the frame of the outlet back to the same grounding bar in the electric panel.
These three wires run together in a larger plastic sleeve. This sleeve can be one of several colors but the most common colors for a basic residential outlet is white or yellow
Electricity leaves the panel through the black wire runs to the outlet. When an appliance or light is plugged into the outlet, the electricity leaves the outlet via the prong of the plug which corresponds with the black wire. It then travels through the appliance or light. When the appliance or light is turned on, the electricity travels through it and returns to the outlet to the prong which corresponds to the white wire and back to the electric panel. Pretty basic.
Sometimes electric outlets wear out due to frequent plugging and unplugging of appliances. Sometimes they burn out due to plugging in an appliance that draws more amps than the outlet is designed to handle. Either will require the outlet to be changed.
BEFORE CHANGING ANY OUTLET DETERMINE WHAT BREAKER IN THE ELECTRIC PANEL SUPPLIES POWER TO THAT OUTLET AND TURN THAT BREAKER OFF. TEST IT WITH AN INEXPENSIVE TEST LIGHT TO ASSURE THE FLOW OF POWER HAS BEEN INTERRUPTED!!!
Rather than explain how to change an outlet, I've included yet another video which is sure to keep your attenton span from expiring. :)
Sunday, April 18, 2010

Sunday, April 11, 2010
Installing a Sump Pump
This winter brought us a LOT of precipitation. So much, in fact, that the ground is completely saturated and any more precip must be run-off. This has presented problems that many of us have never experienced. Water in basements and crawl spaces. This is a direct result of high water tables and is a problem for several reasons. First, those of us who have basements often store seasonal items there. Water, often a foot or more deep, will ruin stored items. Water will cause mildew to grow on floor joists and other framing members. This mildew will digest the cellulose in wood eliminating its strenth causing structural damage to your home. Water will also create an environment in which toxic black mold will thrive - all very good reasons to take the necessary steps to remove it immediately and permanently from under your house.
In light of this we will cover the installation of a sump pump in order to pump this water out.
First, we're going to choose a pump. Pumps vary in horsepower and voltage, as well as how far it will pump water up hill, or "head". For example a pume in a basement will have to pump water up hill to get it outside. A pump in a crawlspace will only have to pump it vertically. This video will give you an idea of what pump you will need.
Next we will need to dig a hole beneath the lowest horizontal surface - the floor of the basement or the dirt bottom of the crawlspace. You can buy many different sizes of plastic sumps to accomodate many different applications. A plastic sump is a small plastic "drum" with a removable top. This drum will have holes drilled in the sides (or you may have to drill your own) and it is placed into the hole you dig. The sump should be at or slightly above level with the surface when placed into the hole. The hole should be a larger diameter than the sump so that you can add stone or gravel around it to keep dirt from getting into the holes in the side of the sump.
Once the hole is dug, the sump is place into the hole, and the gravel is placed around the outside of the sump, it's time to place the pump into the sump. Locate the pump in the sump so that the float is free to move up and down as the water level changes without hitting the side of the sump. this is important if you want the pump to work properly. Once the pump is properly place into the sump, it's time to install the plumbing necessary to get the water out of the basement or crawlspace. The most common drain line used is 1 1/2 inch PVC drain line. Follow the instructions that come with the pump and always use a check valve to make sure a portion of the water you pump out doesn't drain back into the sump after the pump shuts off. Here is another video to give you an idea of how a good system should look. It shows all the components even though this may not be your specific situation - you may have a crawl space installation which will look different but the components will be the same.
Providing an exit for your drain line will be different depending on your circumstance. The most common way is to bore a hole through the foundation wall, slide the pipe through, and seal it with mortar. I have, however, seen these drain lines tied into the public sewer system.
It should be noted that in basements with concrete floors it will be necessary to break through the concrete. This can be done by using a circular saw with a masonry blade or a small jack hammer (and a HEPA respirator with safety glasses).
This is a relatively complex project and should only be attempted by those with a fair degree of mechanical ability.
In light of this we will cover the installation of a sump pump in order to pump this water out.
First, we're going to choose a pump. Pumps vary in horsepower and voltage, as well as how far it will pump water up hill, or "head". For example a pume in a basement will have to pump water up hill to get it outside. A pump in a crawlspace will only have to pump it vertically. This video will give you an idea of what pump you will need.
Next we will need to dig a hole beneath the lowest horizontal surface - the floor of the basement or the dirt bottom of the crawlspace. You can buy many different sizes of plastic sumps to accomodate many different applications. A plastic sump is a small plastic "drum" with a removable top. This drum will have holes drilled in the sides (or you may have to drill your own) and it is placed into the hole you dig. The sump should be at or slightly above level with the surface when placed into the hole. The hole should be a larger diameter than the sump so that you can add stone or gravel around it to keep dirt from getting into the holes in the side of the sump.
Once the hole is dug, the sump is place into the hole, and the gravel is placed around the outside of the sump, it's time to place the pump into the sump. Locate the pump in the sump so that the float is free to move up and down as the water level changes without hitting the side of the sump. this is important if you want the pump to work properly. Once the pump is properly place into the sump, it's time to install the plumbing necessary to get the water out of the basement or crawlspace. The most common drain line used is 1 1/2 inch PVC drain line. Follow the instructions that come with the pump and always use a check valve to make sure a portion of the water you pump out doesn't drain back into the sump after the pump shuts off. Here is another video to give you an idea of how a good system should look. It shows all the components even though this may not be your specific situation - you may have a crawl space installation which will look different but the components will be the same.
Providing an exit for your drain line will be different depending on your circumstance. The most common way is to bore a hole through the foundation wall, slide the pipe through, and seal it with mortar. I have, however, seen these drain lines tied into the public sewer system.
It should be noted that in basements with concrete floors it will be necessary to break through the concrete. This can be done by using a circular saw with a masonry blade or a small jack hammer (and a HEPA respirator with safety glasses).
This is a relatively complex project and should only be attempted by those with a fair degree of mechanical ability.
Friday, February 5, 2010
Keeping Your Home Energy Efficient
It's been a while since our last post. Keeping a blog running requires a lot of time and effort. But the show must go on.
In light of the recent cold weather, I thought it would be appropriate to address issue that matters most to many homeowners - energy efficiency. When the weather is extremely cold, we tend to notice how inefficiently our homes really keep the heat in. While we may feel a draft here and there, it never strikes us as hard as when we receive the bills. For some, a $100.00 electric bill can quickly become $800.00 when the weather gets cold.
In this segment, we'll address the issue of adequate insulation in our ceilings.
Depending on the age of you home, you may have ceilings R-30, R-19, or R-13 fiberglass batt insulation, you may have blown insulation, or you may have none at all. If you have none at all, it will save you money in the long run to install insullation. You may elect to do it yourself or to have a professional install it for you.
Attics or upper crawl spaces without flooring are the easiest and arguably the most important for keeping heat in your home due to the fact theat heat rises.
This video will show you how to install fiberglass batts in an attic with no flooring.
This video shows blown cellulose being installed.
Either way you go, the finished product should provide an insulation rating of at least R-35 in attics.
Next time we'll address insulating walls.
In light of the recent cold weather, I thought it would be appropriate to address issue that matters most to many homeowners - energy efficiency. When the weather is extremely cold, we tend to notice how inefficiently our homes really keep the heat in. While we may feel a draft here and there, it never strikes us as hard as when we receive the bills. For some, a $100.00 electric bill can quickly become $800.00 when the weather gets cold.
In this segment, we'll address the issue of adequate insulation in our ceilings.
Depending on the age of you home, you may have ceilings R-30, R-19, or R-13 fiberglass batt insulation, you may have blown insulation, or you may have none at all. If you have none at all, it will save you money in the long run to install insullation. You may elect to do it yourself or to have a professional install it for you.
Attics or upper crawl spaces without flooring are the easiest and arguably the most important for keeping heat in your home due to the fact theat heat rises.
This video will show you how to install fiberglass batts in an attic with no flooring.
This video shows blown cellulose being installed.
Either way you go, the finished product should provide an insulation rating of at least R-35 in attics.
Next time we'll address insulating walls.
Sunday, January 24, 2010
Heating System Maintenance
Ok folks. Our heating systems are often neglected and overlooked when it comes to routine maintenance. I'm going to share something with you that just happened to me.
About 2 years ago I had Coastal Comfort install a new Central heat and air conditioning unit for both my first and second floor. I decided to go with a heat pump system since it would put everything on one bill. I figured since I was replacing an old outside package unit which used propane to heat and a compressor for A/C (commonly called a hybrid system), anything would be better than the old, inefficient unit I had.
They installed a new 3.5 ton unit for the first floor and a 2.5 ton unit on the second floor. They also installed an emergency heat strip inside the air handlers in the event it got colder that the heat pump could handle. for the first two years everything was fine. I noticed that about 1 1/2 months ago my heating system didn't feel as though it was working properly. On the coldest nights, the system could only heat the house to about 64 degrees and was running constantly. I believed it was due to the fact that it was a heat pump (which won't heat as well as the new hybrid systems on really frigid nights) and there were many consecutive days when the temperature never rose above freezing. I let it go even though the system ran constantly and the thermostat indicated that the system was running in "Emergency Heat" mode for days on end. As the days got warmer and the system continued to run in Emergency Heat mode, I was convinced something was wrong.
I called Kevin Coleman, owner of Coastal Comfort, and explained the situation. He sent over one of his techs, Tim, who went to work right away to troubleshoot the problem. Within 15 minutes he determined that my compressor was bad. Luckily my outside compressor unit was a York unit which has a five year warranty. My new compressor was ordered and is enroute as I write this. While Tim was here I asked him a few questions in order to find out what I could do in the future to keep my system running in optimum condition and possibly prevent future problems. Tim recommended the follwing:
1) Replace the air filters in the cold air returns every thirty days as a rule of thumb. They may have to be replaced more or less frequently base on your individual situation, i.e. if you have dogs that shed a lot, etc.
2) Have your heating system serviced annually by licensed professionals so that potential problems may be identified before they occur.
3) If you suspect your system is having a problem, call your HVAC tech right away.
If I had followed number 3, I would have saved a good bit of money. My electric bill was about $700 higher last month because my system was running in Emergency Heat mode which causes the electric heat strips to be activated. These strips use tremendous amounts of electricity. These strips would not have been used had the compressor been working properly properly.
I recommend Coastal Comfort for all of your HVAC needs. They offer prompt, courteous service at a reasonable price. They even cover geothermal units.
http://www.coastalcomfort.com/
About 2 years ago I had Coastal Comfort install a new Central heat and air conditioning unit for both my first and second floor. I decided to go with a heat pump system since it would put everything on one bill. I figured since I was replacing an old outside package unit which used propane to heat and a compressor for A/C (commonly called a hybrid system), anything would be better than the old, inefficient unit I had.
They installed a new 3.5 ton unit for the first floor and a 2.5 ton unit on the second floor. They also installed an emergency heat strip inside the air handlers in the event it got colder that the heat pump could handle. for the first two years everything was fine. I noticed that about 1 1/2 months ago my heating system didn't feel as though it was working properly. On the coldest nights, the system could only heat the house to about 64 degrees and was running constantly. I believed it was due to the fact that it was a heat pump (which won't heat as well as the new hybrid systems on really frigid nights) and there were many consecutive days when the temperature never rose above freezing. I let it go even though the system ran constantly and the thermostat indicated that the system was running in "Emergency Heat" mode for days on end. As the days got warmer and the system continued to run in Emergency Heat mode, I was convinced something was wrong.
I called Kevin Coleman, owner of Coastal Comfort, and explained the situation. He sent over one of his techs, Tim, who went to work right away to troubleshoot the problem. Within 15 minutes he determined that my compressor was bad. Luckily my outside compressor unit was a York unit which has a five year warranty. My new compressor was ordered and is enroute as I write this. While Tim was here I asked him a few questions in order to find out what I could do in the future to keep my system running in optimum condition and possibly prevent future problems. Tim recommended the follwing:
1) Replace the air filters in the cold air returns every thirty days as a rule of thumb. They may have to be replaced more or less frequently base on your individual situation, i.e. if you have dogs that shed a lot, etc.
2) Have your heating system serviced annually by licensed professionals so that potential problems may be identified before they occur.
3) If you suspect your system is having a problem, call your HVAC tech right away.
If I had followed number 3, I would have saved a good bit of money. My electric bill was about $700 higher last month because my system was running in Emergency Heat mode which causes the electric heat strips to be activated. These strips use tremendous amounts of electricity. These strips would not have been used had the compressor been working properly properly.
I recommend Coastal Comfort for all of your HVAC needs. They offer prompt, courteous service at a reasonable price. They even cover geothermal units.
http://www.coastalcomfort.com/
Friday, January 15, 2010
Vinyl Siding
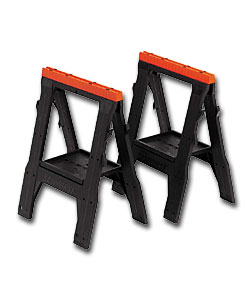


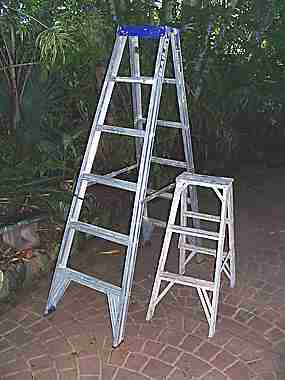



Applying vinyl siding to your house is no easy task and one which will likely only have to be done once in your lifetime. It requires a lot of time, a good bit of skill, and some expensive equipment the average homeowner doesn't usually have in his garage. There are, however, a lot of homeowners who tackle this job themselves and create a nice finished product.
Lets get started by gathering our equipment. This is what we'll need.
Nail pouch
Tape measure - at least 25 feet
Hammer
Metal snips
pencil
Sawhorses
Aluminum brake
8' step ladder
Extension ladders
Walk plank(s)
Ladder jacks
Safety glasses
levels (2', 4', and a water level)
levels (2', 4', and a water level)
Then you'll need to gather your material:
Foam board insulation
Tape
J-Channel
Starter strip
Corner posts
Siding
Aluminum coil (in a color you decide will be the trim color of your house)
Nails - roofing nails and colored trim nails for the aluminum coil
I'm new at this blogging thing and putting the photo's where you want them is tricky for me.
Next we'll start prepping the house for siding.
First well have to determine what type of siding is on the house and what we want to do with it. In many cases there are asbestos shingles nailed in the outside of the house. If we leave them on and go over them with insulation board we run the risk of breaking it into pieces that fall behind the foam insulation and create bulges that show when we install the vinyl siding. If we remove it, it must be double bagged in bags that are marked "asbestos" and taken to the landfill on specific days (you may have to call to get that info). It also costs twice what regular construction debris costs to dump. This decision is a personal one and must be made with budget in mind.
If the existing siding is asbestos, now is the time to remove it. Lay 6 mil sheets of polyethylene down on the ground from the wall on which your working to a distance 8' to 10' out. Use a face mask style respirator with the "purple" HEPA style cartridges. Asbestos is safe until you begin the removal process which creates asbestos dust. This dust is easily inhaled and causes a wealth of serious long term medical problems.
After asbestos is removed, install foam insulation board. I'm going to be brief as it relates to the intricacies of installation because I intend to include the heinous series of instructional videos we've come to know and love.
Preparation of the house for installation of the vinyl siding is as important as hanging the siding itself. At this point it would be prudent to view the link below which allows you to access a series of 4 videos.
Thursday, January 14, 2010
Toilet Replacement - This blog has already gone in the crapper
Oh that was bad. Really bad. I'll just get to the meat and potatoes of the post and hope no one notices the title.
Most residential toilets have two main parts. The bowl and the tank. The tank is the upper part that holds the water - about 1.6 gals for the newer enviro-friendly toilets. The bowl is the part that holds the - well, you know. The tank bolts to the bowl using two long brass screws with large heads and rubber washers to keep it from leaking when it's filled with water. There is a large hole located between those bolts through which the water passes into a hole in the rear portion of the bowl when the toilet is flushed. That hole is sealed with a thick rubber gasket prior to the bolts being installed to make the tank and bowl one sealed, watertight unit.
Now, first we must turn off the water supply line by shutting off the valve located behind the toilet. It either comes from the floor or the wall. Once this is done, we flush the toilet to empty the tank. Remove the remaining water using a ladle and a towel.
At the bottom of the bowl on each side where the bowl meets the floor, there are two flange bolts that hold the toilet in place. Remove both bolts and lift the toilet straight up and take it directly outside to be cleaned if reusing or to be discarded.
On the floor where the toilet was located you will see a piece of plumbing known as the toilet flange which is attached to the drain pipe. This pipe is what carries the waste water from the toilet to the main sewer line. The large center hole is where the waste enters the line from the bowl. This connection is made water tight by placing a special wax ring over the large hole and the toilet outlet is centered onto it. This flange also has two locations around the perimeter. The flange bolts go through these holes, through the bottome of the bowl and are tightened to hole the entire assembly firmly in place. The old wax ring must be completely removed. Remember to plug the large hole on the floor with a rag or plastic bag because sewer gases will make you sick - and they really smell :).
The new toilet will come with directions on how to assemble. Once it is assembled, install a new wax ring to the location on the flange from which you removed the old one. The new wax ring should come with new flange bolts. Install them where the old ones were located. Set the new toilet straight down ond the wax ring so that the new flange bolts come through the holes in the bottom of the bowl. Tighten the bolts EVENLY and slowly - and only until the toilet is stable on the floor. Over tightening can crack the porcelain around the bolt holes. Now re-attach the supply line and turn it on slowly, being certain to check for leaks where the tank and bowl join and where the supply line connects to the bottom of the tank.
Once your satisfied you have no leaks, wait until the tank fills and shuts off completely. Make certain that the water level is supposed to be as indicated by the instruction that come with the toilet. Now flush the toilet. Let the tank fill and repeat the cycle another time. If the toilet is sturdy and there are no leaks.......congratulations.
I'm really not trying to be wordy but if something is not done correctly it will leak. I've included an instructional video to help you so I won't go into any further precautions, etc.
If the condition of the toilet is questionable it could save you time, money, and a huge head ache if you just replace it. You can buy whats known as a "toilet-to-go" from Lowes for about $100.00. This includes the wax ring, the fluid master (the mechanism that meters the water), flange bolts, Tank, bowl, and toilet seat. EVERYTHING.
Most residential toilets have two main parts. The bowl and the tank. The tank is the upper part that holds the water - about 1.6 gals for the newer enviro-friendly toilets. The bowl is the part that holds the - well, you know. The tank bolts to the bowl using two long brass screws with large heads and rubber washers to keep it from leaking when it's filled with water. There is a large hole located between those bolts through which the water passes into a hole in the rear portion of the bowl when the toilet is flushed. That hole is sealed with a thick rubber gasket prior to the bolts being installed to make the tank and bowl one sealed, watertight unit.
Now, first we must turn off the water supply line by shutting off the valve located behind the toilet. It either comes from the floor or the wall. Once this is done, we flush the toilet to empty the tank. Remove the remaining water using a ladle and a towel.
At the bottom of the bowl on each side where the bowl meets the floor, there are two flange bolts that hold the toilet in place. Remove both bolts and lift the toilet straight up and take it directly outside to be cleaned if reusing or to be discarded.
On the floor where the toilet was located you will see a piece of plumbing known as the toilet flange which is attached to the drain pipe. This pipe is what carries the waste water from the toilet to the main sewer line. The large center hole is where the waste enters the line from the bowl. This connection is made water tight by placing a special wax ring over the large hole and the toilet outlet is centered onto it. This flange also has two locations around the perimeter. The flange bolts go through these holes, through the bottome of the bowl and are tightened to hole the entire assembly firmly in place. The old wax ring must be completely removed. Remember to plug the large hole on the floor with a rag or plastic bag because sewer gases will make you sick - and they really smell :).
The new toilet will come with directions on how to assemble. Once it is assembled, install a new wax ring to the location on the flange from which you removed the old one. The new wax ring should come with new flange bolts. Install them where the old ones were located. Set the new toilet straight down ond the wax ring so that the new flange bolts come through the holes in the bottom of the bowl. Tighten the bolts EVENLY and slowly - and only until the toilet is stable on the floor. Over tightening can crack the porcelain around the bolt holes. Now re-attach the supply line and turn it on slowly, being certain to check for leaks where the tank and bowl join and where the supply line connects to the bottom of the tank.
Once your satisfied you have no leaks, wait until the tank fills and shuts off completely. Make certain that the water level is supposed to be as indicated by the instruction that come with the toilet. Now flush the toilet. Let the tank fill and repeat the cycle another time. If the toilet is sturdy and there are no leaks.......congratulations.
I'm really not trying to be wordy but if something is not done correctly it will leak. I've included an instructional video to help you so I won't go into any further precautions, etc.
If the condition of the toilet is questionable it could save you time, money, and a huge head ache if you just replace it. You can buy whats known as a "toilet-to-go" from Lowes for about $100.00. This includes the wax ring, the fluid master (the mechanism that meters the water), flange bolts, Tank, bowl, and toilet seat. EVERYTHING.
Wednesday, January 13, 2010
Clearing a Clogged Sink


From time to time we all notice that the drain in our kitchen sink slows down of stops draining completely. Many times this is caused by the drain "trap" becoming clogged.A couple of things first.
A trap comes in two main configurations; an "S-trap" (example on right)and a "P-trap" (example on left). With an "S-trap" the water drains out through the bottom of the sink, through two "U shaped" fittings put together to make an "S", and out through the floor. With a "P-trap", the water drains out through the bottom of the sink into two fittings put together to make a "P", and out through another plumbing fitting in the wall. S-traps are commonly used in older homes and P-traps are used in newer homes and meet modern code requirements today. Also, kitchen sinks usually use 1 1/2 inch drains and bathroom vanity sinks usually use 1 1/4 inch drains and are made of either chromed metal or plastic.
Now with that out of the way, we can get to work. If your drain is clogged, it's often best to just take the five minutes to remove the trap and clean it out rather than to pour chemicals into the drain and run the risk of being unable to clear the drain and then having to take apart the drain with chemicals in it.
First gather a few items you will need. A towel, a bucket, and a pair of channel lock pliers. Rather than typing four or five paragraphs and run the risk of still not getting my point across, I thought I'd just provide a youtube video that explains things.
Subscribe to:
Posts (Atom)